Understanding the Prototyping Process
At Beyond Design, prototyping a new product(s) is a key part of our process. Prototypes enable our product development team to test and validate human factors, ergonomics, mechanical features and aesthetics. The process of deciding how to go about making a real-world representation of our concepts involves both experience and intuition.
To explain the process further, I created a small keychain flashlight as an example. The assembly of the keychain flashlight is comprised of four off-the-shelf parts (three batteries and one Light Emitting Diode (LED)) and four custom parts (two housing parts, one button, and one Contact Spring).
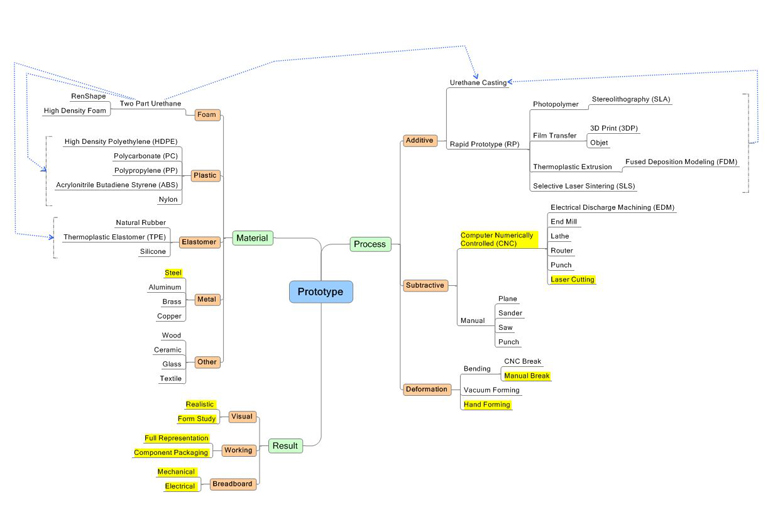
The first step in developing a prototype is deciding the level of realism you would like to achieve. From there, depending on the level of realism, you decide what material to use based on what the prototype should simulate. Often the level of visual realism is dictated by cost limitations or what the intended use will be. The prototyping method is selected based on both the level of realism and the material chosen.
For instance, if the prototype is for photography purposes only, there is no need to create functionality and a visual prototype or model will serve its purpose. On the other hand, if the intention is to prove out a mechanism or part fit then a working prototype (also called a functional prototype) or even a breadboard (a functional prototype, but often larger and more ‘Frankenstein’ looking) will work.

A breadboard prototype - construction base for prototyping of electronics (photo from dev.emcelettronica.com)
Sometimes, the intention is to sell both the product’s looks and function, in which the prototype is designed to look and function just like the final product is intended to (or as close as possible). This last option we call a Functioning Visual Prototype – this is the end result we’ll use for the flashlight example.
In the keychain example, the red translucent housing parts would ultimately be made out of Polycarbonate – a common plastic which is very good for clear plastics (some plastic eyeglasses are made from this material). In order to simulate this, our best bet would be to use a clear Stereolithography (SLA) and tint a clear-coat to paint it with (see the selection chart below). This process, popularly referred to as 3D printing, uses a laser to cure a resin in layers. One layer is added to the next, so this type of prototyping is called an additive process. If we did not paint the parts, they would be a frosty white, and work fine for testing fit. However, this material is more brittle than actual plastic so you have to be careful.
For the button, we would like to simulate a harder Thermoplastic Elastomer (TPE). TPE is the type of rubber which is often used to add grip to a pen or toothbrush. In order to simulate the button, the additive processes can be used, but they often break and do not have a good appearance. For this model we would create a hard SLA part (same as the material used for the housing parts), only this part would be sanded, primed and cast into a flexible rubbery mold. A two part flexible Urethane mix, tinted dark grey, would be poured into the mold to create the flexible part. Sometimes the softness, or durometer, of the material is not right and casting another is not a problem at this point. This process is used for harder parts when you want to make multiples of a prototype (usually two to thirty).
Finally, to make the metal contact spring thin, we would most likely get it laser cut (a subtractive process) and bend it by hand (a deformation process). Once we assemble the parts, we should learn a great deal about how well it works, how it feels, and if there are any potential manufacturing problems to be solved. This gives our team and the client more confidence cutting steel in expensive molds for production.
After all is said and done, a photorealistic rendering of the final product is shown below.
The type of prototyping process you choose ultimately depends on what the end result should be. Do you want a functional prototype that operates much like the final product would? Do you need something for photography purposes only? Do you need to test user interaction? Our team can help you decide what material and method is best for your design. Our designers and engineers ensure critical details and finishes reflect the final design intent. To learn more about our prototyping capabilities, please click here.
Written By: Mark Eyman, Senior Product Design Engineer, Beyond Design, Inc.


 Top
Top
