The Steps to Build a New Product
It happened. The light-bulb moment, the flash of brilliance that you were starting to wonder if it was a myth. Maybe it happened suddenly and unexpectedly, or perhaps (more likely) it came after hours of brainstorming and late-night idea sessions.
However it came, it’s here: your amazing product idea. The one that customers have been waiting for all this time, the one that’s going to change everything.
Now what?
This intro guide to product design for entrepreneurs will help get you from an idea in your head to a product on your shelf. Whether you’re looking into starting a manufacturing business or simply want to launch one of the many successful product-based companies that outsource manufacturing to a third-party, this guide will show you the way.
Here’s how to get from idea to store shelves.
Step 1: Document & Develop Your Idea
Step 1 is arguably both the easiest and the most important step of the entire process— write your idea down. Whether that means a bullet-point description, a rough and dirty sketch, or a detailed digital model, it’s vital that you translate your initial idea to a physical representation that exists outside of your brain— no matter how undeveloped and rough it may be.
Not only is this an essential way of remembering the key elements of your initial vision, but you’ll also find that just the simple process of translating your idea from brain to paper will aid in shaping the direction of your idea.
That leads us to the second part of step 1— developing and expanding your idea.
From almost the moment you first have your big idea, your brain will likely start identifying problems with it. This doesn’t mean your idea for a product isn’t a great one. It just means that it needs some refining and development. It’s important to ask yourself some questions about your idea that will help you flesh it out and start to turn it into something concrete and doable during this stage.
Important Questions
- Who are your product’s ideal users?
- How expensive will your product be to manufacture?
- Are there any products already solving the problem your product would solve?
- What will set your product apart?
- How will you market your product?
- What problem will your product solve?
- Should your idea be adjusted to be more niche-specific or more general use?
- Does your idea require technology that doesn’t exist yet?
- What benefits does your idea offer?
These are just a few examples. Based on your idea, this list may look different— and in some cases, much longer.
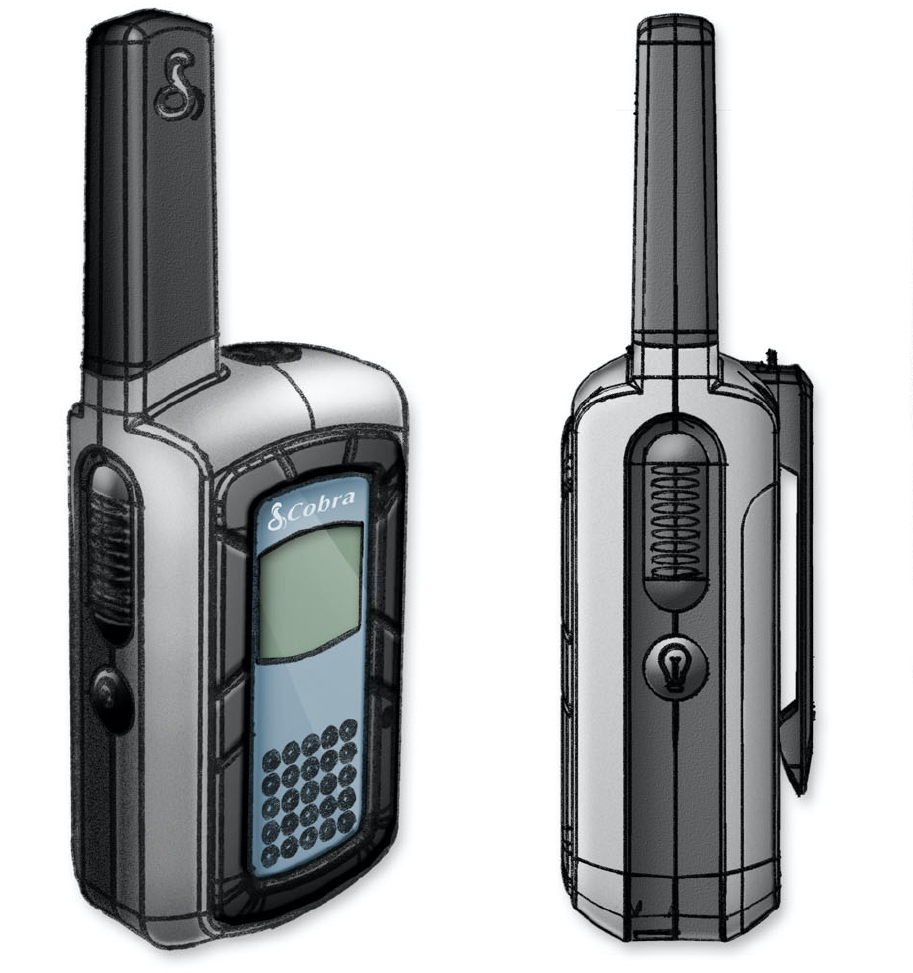
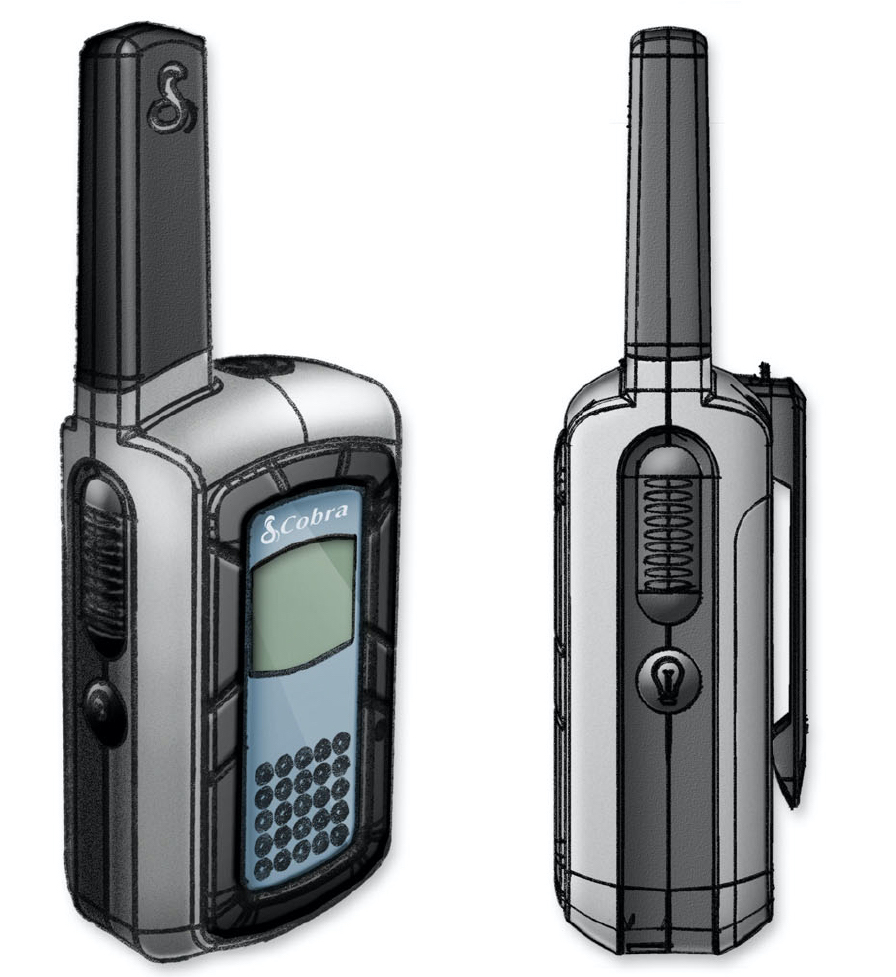
Step 2: Design the Product
Once you’ve done some initial ideation and expanded your idea a bit, it’s time to get into the work of design. Depending on the product, this may occur in digital design software, paper drafts, or some other medium that makes sense for you.
Whatever you use, the key to the design process is getting ideas out before you decide whether they work or not. This is the time to experiment before there’s any real cost associated with the design process. Try ideas, change the design, completely reimagine the product itself. Explore your creativity during the early parts of this stage.
Eventually, you’ll begin to refine your product from your wildest imagination into something doable— something that can be manufactured and sold.
Once you reach this stage, it’s time to prototype.
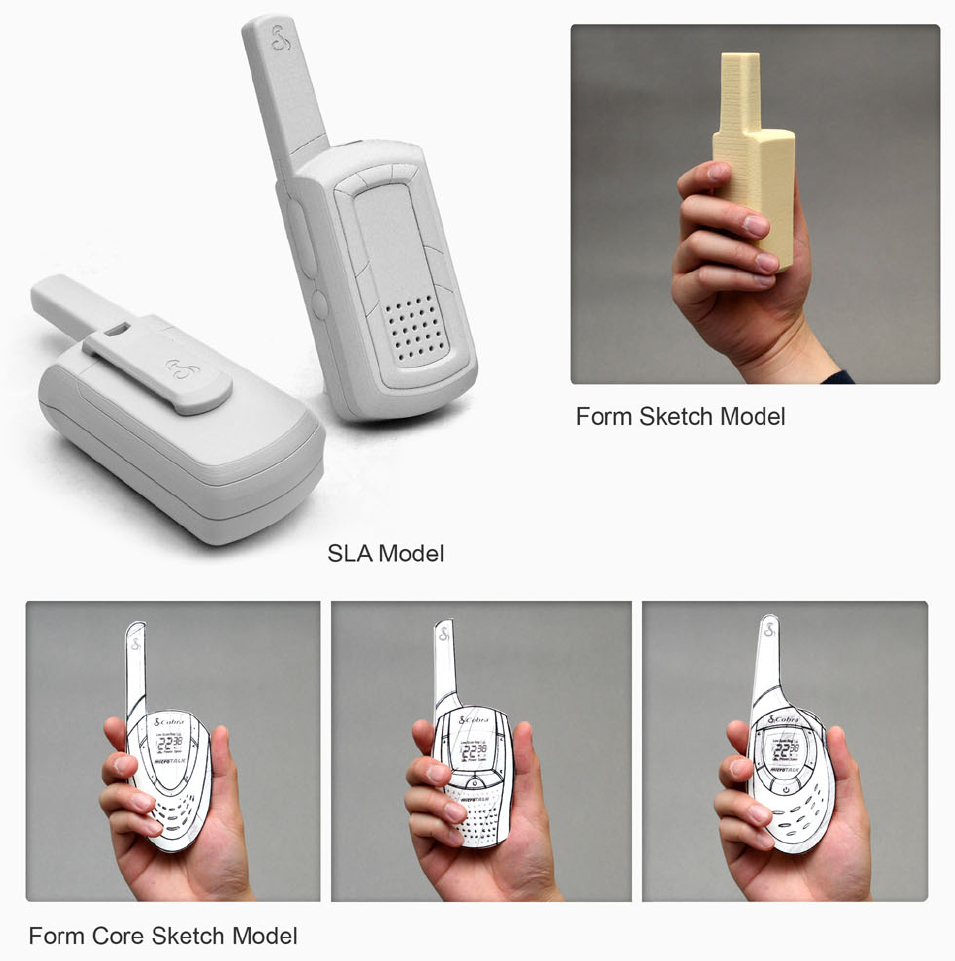
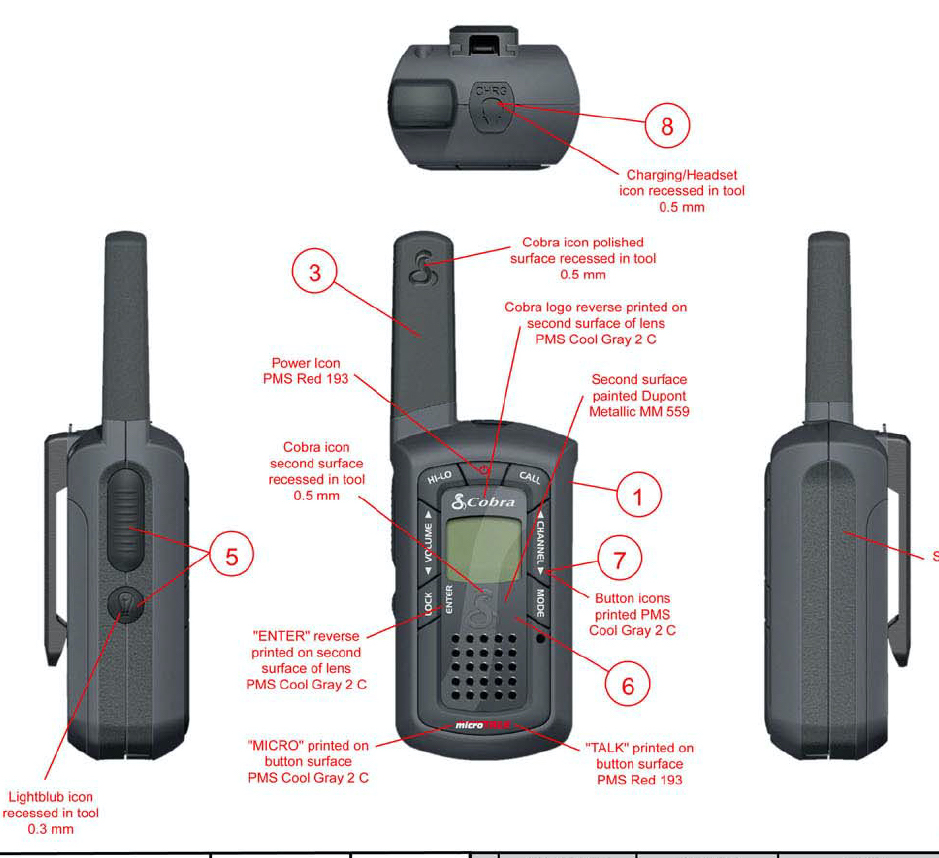
Step 3: Prototype, Test, & Prototype Again
Prototyping is the process of creating a physical model of your product. The prototypes range from fully-functioning products to simple 3D representations of what the product will look like without actually having all of its functions.
There are advantages and disadvantages to each type. Simple prototypes that aren’t fully functional can be cheaper and quicker to produce, which can be important in the early stages of product development. However, they don’t give you all of the information you need about your product’s functionality.
Fully-functioning prototypes are testable— a vital part of the process. Once you have a working prototype, you can put it in the hands of actual users and get feedback. The testing and feedback phase is crucial when it comes to developing your product.
Ideally, your prototypes will become more robust and functional as you go. Early on, when you just want to see your product in the real world, a simple, non-functioning prototype may suffice. Later, as you develop and test your product more and more, you’ll want prototypes that come as close as possible to what you hope will be the finished product.
So, how do you know when you have that finished product?
How You Know You Have a Finished Prototype
The truth is that no product is ever ‘perfect.’ But eventually, there comes a time when you have to decide that a product meets its purpose well enough that it’s ready for manufacturing.
Suppose you’re a new entrepreneur that hasn’t yet invested a high level of time, money, or life choices (quitting your job, for example). In that case, you can be a bit more flexible and patient with prototyping and testing— after all, many new products take years to go from idea to store shelves.
Generally, you’ll know the prototype phase is complete when your product in the real world meets the vision you have in your head and when your feedback from user testing is generally positive and encouraging.
But, in the end, no one can tell you when your product is manufacturer-ready but you. This is where your instincts as an inventor and entrepreneur are essential.
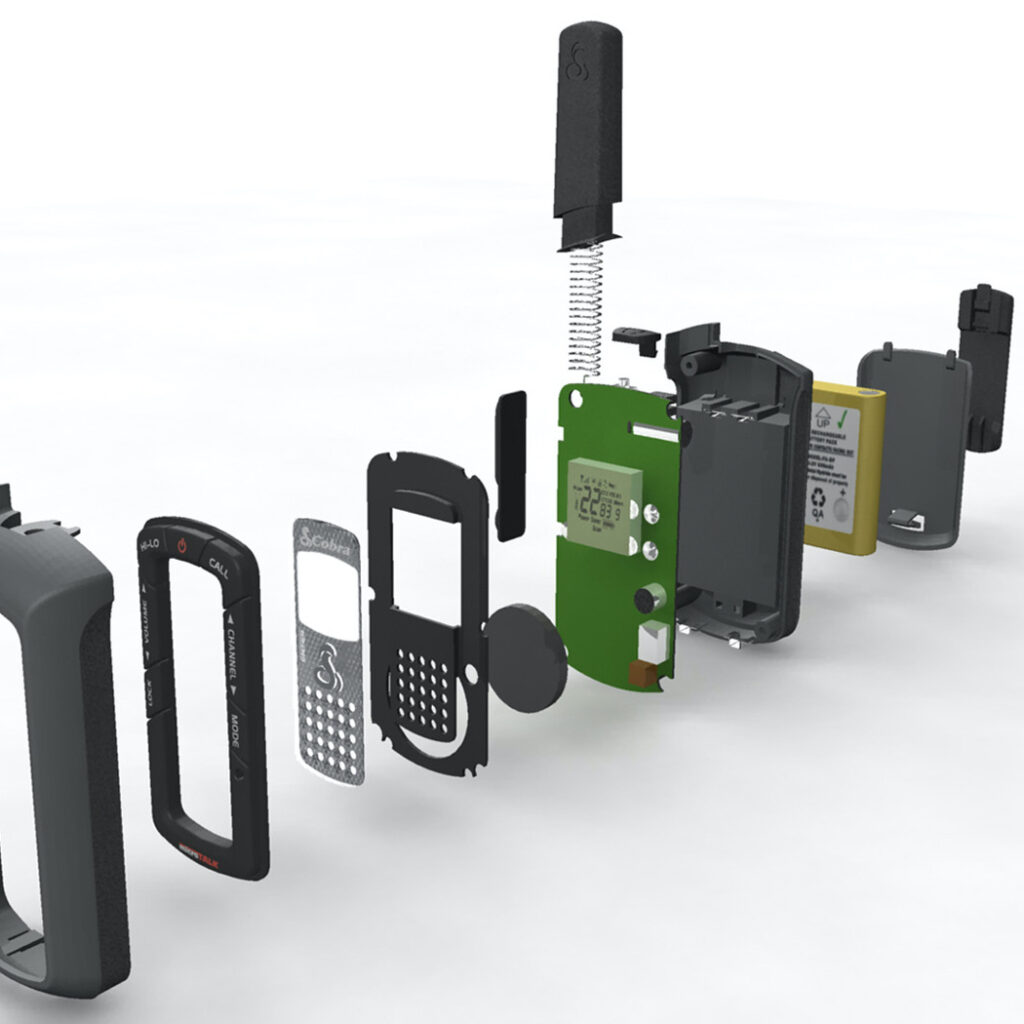
Step 4: From Prototype to Finished Product
Now that your product is ready for manufacturing, what’s next? You’ll need someone to make it for you at scale. Whether that scale is an initial run of 100 units or 10,000 units, finding the right manufacturer is essential.
Finding & Selecting a Manufacturer
Here are some of the things you’ll want to look for in a manufacturer for your product:
- They understand your vision.
- They have experience manufacturing similar products.
- Their facilities are capable of handling the processes required to create your product.
- They follow the right procedures to ensure consistent quality in manufactured products.
- They meet your manufacturing budget.
There are also some key warning signs to avoid in manufacturers, including:
- Bad service
- Failure to listen to and understand your vision
- Changing goalposts— delays, late deliveries, etc.
- Lack of experience generally or in your type of product
Once you find a manufacturer and negotiate the right price, your product can enter production. The next step is getting it onto store shelves and in front of customers.
Step 5: Finding Retailers
Unless you plan to sell your product yourself directly, either through an online store or by opening a brick and mortar storefront, you’ll need to partner with a retailer or retailers to sell your product. While this can be a complicated process, it’s not a particularly complex one— it’s merely about contacting retailers that you think would be a good fit and making your case.
The process of effectively pitching your product to retailers is beyond the scope of this article. Still, there are plenty of resources out there that can help you develop a compelling pitch, choose the right partners that are most likely to sell your product, and getting your product on store shelves.
Taking a product from idea to a big-selling success story isn’t easy. At Beyond Design, product design for entrepreneurs is what we do. Learn more about our product design experience to discover why so many entrepreneurs trust Beyond Design to deliver exceptional products every time.
 Top
Top